Creating a Therapeutic Garden at Home

Anyone that enjoys gardening as a hobby knows how relaxing and calming it is to potter around in the garden for a few hours, and an increasing amount of recent research backs up what us gardeners already know. In fact, it has been proven that one particular bacteria that appears in garden soil triggers the release of serotonin when a person has direct skin-to-soil contact, therefore acting as a natural antidepressant (read the news article here).  

Horticultural Therapy Organisations

In the U.K., the mental health charity Mind has incorporated eco-therapy programmes, including gardening programmes, into the services that it provides to people living with mental health issues. In 2013, the charity released the report ‘Feel Better Outside, Feel Better Inside’ which included research findings from The University of Essex showing the many benefits of eco-therapy for mental well-being. It has been proven to improve mental health, boost self-esteem, help people with mental health problems return to work, improve physical health, and reduce social isolation. Thrive  is another UK organisation that uses ‘social and therapeutic horticulture’ to bring about positive change in the lives of people living with ill-health and disabilities.

Therapeutic gardens are often used in institutional settings as part of the ongoing care and rehabilitation of patients and clients. These gardens are usually on a larger scale than the typical home garden and are designed to address the specific needs on a group of users. However, there are elements of these therapeutic gardens that the home gardener can incorporate into their own outdoor space to make it a place of healing and rejuvenation.

What Are your Goals? 

It might seem counter intuitive to think that goals are important in a healing garden, but if you have a particular health-related issue that you want to address, it makes sense to design a garden that will help with this. For instance, if your goal is to keep active by using gardening as physical exercise, then building raised vegetable beds that you can plant and tend would be a great idea. If your aim is to de-stress in your garden, focus on creating a quiet space with the sounds of nature and minimal care requirements.

When you have had a chance to think about your goals, think about what the garden might look like. A small garden crammed with as many blooms as possible may be your idea of tranquility, for your neighbour, a minimal zen garden with ordered symmetry may put their mind at ease. You will probably intuitively know what a restorative garden means for you but if not, look through magazines or websites like Pintrest to get ideas.

Here’s a few examples of therapeutic gardens with specific goals for different users at one of Thrive’s locations in the UK. At Trunkwell Gardens in Beech Hill, near Reading, they have created five small gardens, known as the Garden Gallery, for people with specific disabilities. The gardens are small, each the size of a typical new build back garden, and focus on gardening solutions and creative ideas for those coping with particular challenges.


Picture taken from thrive.org.uk


This is the ‘Hearts and Minds’ garden. This garden has been designed and planted for people recovering from a stroke or heart attack.They may be challenged by partial paralysis, reduced mobility, limited vision, loss of sensory capacity and physical weakness.


Picture taken from thrive.org.uk


‘The Journey’ is an uplifting garden for people recovering from a mental illness, particularly depression. The garden promotes well-being, stimulates the senses and inspires creativity.


Picture taken from thrive.org.uk

This garden was created for children and young people with special educational needs.


Elements of a Healing Garden for Your Home Garden

Once you have an idea of the style of garden that you would enjoy, and your personal goals for the garden, you can start to incorporate elements that match them. Here’s some common elements in healing gardens.

Nature as Nurture

Spending time in nature has so many benefits for our physical and mental health. Even the smallest garden can be designed to incorporate nature. A small bird bath or bird feeder can provide opportunities for viewing birds and hearing their song. By including plants that are favoured by pollinators, you can enjoy watching ladybugs, bees and hummingbirds in your garden.

Picture taken from http://www.thespruce.com

By incorporating a bird bath and plants that provide food and shelter, even a small garden space can bring the sights and sounds of birds.

Comforting Sounds

Peaceful and soothing sounds can be part of the healing qualities of the garden. Plants that rustle in the breeze, the soothing sound of running water, and wind chimes that release calming tunes are some options.

Outdoor Project

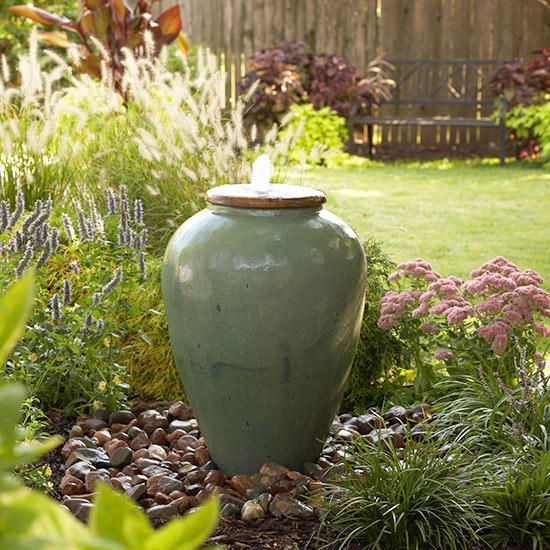
A small pot with a gurgling spout can provide the soothing sound of water.  Picture taken from http://www.bhg.com


The Healing Power of Plants

Plants have the power to heal and revitalize in many ways. Many herbs have medicinal properties, and can easily be incorporated into a small garden or even garden pots. Mint and lemon balm are plants that do well in pots (and won’t run rampant as they can tend to do in garden beds) and that can easily be picked and steeped to make simple, healthy teas. If you have more space, moon gardens and mandala wheels or medicine wheels can be easy to set up by removing areas of lawn.

Tea Garden


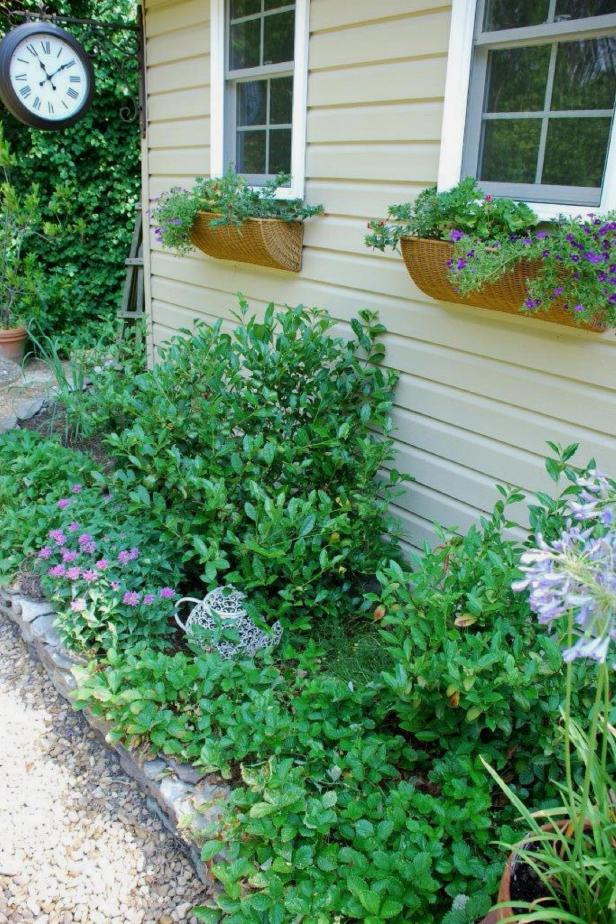
The photo opposite show how a small raised bed had been turned in a ‘tea garden’, incorporating different types of Mints, Lemon Balm, Lemon Verbena, Monarda and Chamomile.

Picture taken from http://www.bhg.com


Purpose of a Healing Garden MEDICINE WHEEL | Medicine Wheel Garden (Photo: Ginny Shannon)

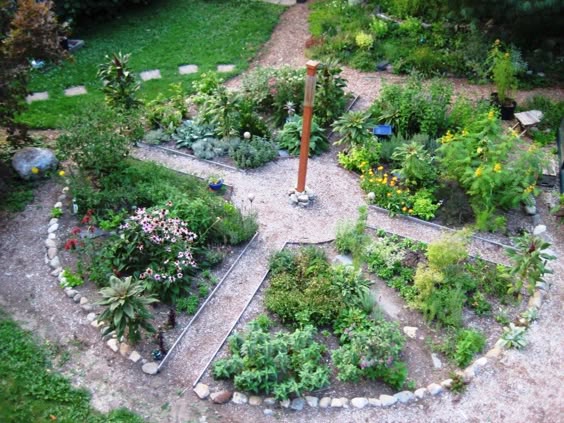
A traditional Medicine Wheel planted with medicinal and healing plants. Photo taken from http://www.inspirationforthespirit.com

A vegetable garden can be planned to incorporate foods that provide specific vitamins and minerals that you may benefit from (and as an added benefit provide opportunities for exercise and Vitamin D uptake in their maintenance). Fragrance garden can be used to provide scents that are personal favourites or to grow herbs that are well-known for their healing properties (lavender is a commonly used essential oil in calming and de-stressing remedies). For some, a garden that incorporates flowers that can be cut and/or dried provides an output for their creative interests. As with your overall goal for creating a therapeutic space, think about what you  enjoy and are interested in, and incorporate that into the space available to you.

Feeling Inspired?

If you want some help creating a healing garden, feel free to contact us about our services. Click here. 

What to Read Some More?

Monty Don, the much-loved British gardening expert, has been open about his mental health struggles. In this article, he talks about how gardening as offered him much-needed therapy during bouts of depression.

In 2018, The Chelsea Flower Show featured the RHS Feel Good Garden. Read an article with the garden’s designer here. 

After the Chelsea Show, the garden was transferred to a senior’s care facility. Watch the video here. 

In his TV series Love your Garden, Alan Titchmarsh surprises homeowners dealing with difficult life circumstances with a garden makeover that helps them cope with their particular situation. Season 1 is currently on Netflix.

Posted in Horticultural Therapy | Tagged | Leave a comment

Gardening with Young Children

cilldaffMany schools now have food gardens and gardening clubs that encourage students to learn about growing plants.

However, children can learn about gardening before they head out the door to kindergarten. If you are keen to start gardening at home, in a daycare, or in your community with very young children (as young as one-year old if you’re eager!) here are some tips for getting started.

Start with your end goal in mind

What are you aiming for in getting children into the garden? This will help inform the design of the garden and the choice of plants to grow. If you just want to spend time outside pottering in the fresh air, then you can choose something as simple as planting annual plants with bright colours that young children will be excited by. Even the smallest hand can make a whole in potting soil that a small annual can be popped into. The smallest, shadiest spot with one pot can become a great source of fun if you just want to keep small children busy (just have a brush nearby to sweep up all the soil that makes its way out of the pot!)

If your goal is to use the garden to introduce basic science or ecology, plan to incorporate plants that encourage pollinating insects into the garden, or install a compost bin or worm composting bin. Pollination, insect lifecycles, composting and worms are topics that can be enjoyed and understood at the most basic level by very small children.

If your main aim is to encourage fussy eaters to try more fruit or vegetables, choose easy crops that children find fun and enjoy eating straight from the garden.

kids2

The parents in this family wanted to encourage their young children to eat a wider range of food. Learning about nature was also important, so food crops were interplanted with perennial plants that encouraged pollinating insects into the garden.

Set yourself up for success

To get young children engaged in the garden, you want to make sure that they can see progress and interact with whatever crops you decide to grow. To get the very best out of the experience, a bit of planning in the garden layout and design will make a big difference to the end results. Here’s some basics to consider before you get started.

  • Find the best spot for the plants you want to grow: if you want to plant food crops, most fruits and vegetables require at least 6 hour of sun each day. If all that is available is a shady spot, consider growing herbs or leaf crops (e.g. spinach) that don’t require lots of sun.
  • Consider using raised beds: raised beds are a good options in children’s gardens for several reasons. Firstly, you can add a really good quality soil instead of having to work with the existing soil at ground level. This is particularly important if you are growing vegetable crops, where the right balance of organic matter, nutrients and soil acidity really makes a difference to the quality and yield of the crops. Secondly, you can build the beds to be at the right height for the children using the garden. Think about whether children will be standing or on their knees (and if on their knees, choose a surface that will be soft enough to kneel on) and how far a small child can lean in. A comfortable dimension for adults using a raised bed is 3′ x 3′. Smaller beds may be required for children, or adult assistance will be required to reach the middle of the bed.
  • Use good quality soil: for fruit and vegetable drops, you will see the best results when you use a soil that drains well and contains ample organic matter to feed the crops. If using raised beds, consider filing them with a ‘veggie mix’ soil that has been blended specifically for growing food, and contains the right amount of organic matter and best acidity for food crops. If you are using existing ground level beds, add compost to the beds in the early spring before planting. If you want to grow organic vegetables, you can buy an organic veggie mix or compost. For crops grown in pots (especially herbs) its very important to have enough drainage, so that roots do not become too wet. Again, you can a potting mix specifically for food crops. Make sure the bottom of the pot has plenty of drainage by adding a layer of stones at the base.
  • Choose crops that are easy to grow and that children will enjoy: the good news is that the crops that are the easiest to grow can be the ones that children like best. It’s great to have a mixture of crops that can be eaten right off the vine and some that you can involve your children in cooking. Also aim to plant crops that give you the longest growing season possible, from early spring snap peas, to fall pumpkin and winter swiss chard.

Make it inviting to children

Make the space look fun and inviting, and young children will be more likely to want to spend time there.

kids5

This garden bed was long and narrow. Use was made of the vertical space by growing easy crops up simple bamboo tripods (snap peas and beans).

kids1

This simple vertical garden was made using a recycled pallet. It was filled with beautiful smelling herbs that could easily be smelled and picked by small hands, including chocolate mint, strawberry mint and pineapple sage.

kids4

Pots were painted in bright colors. Stepping stones were painted with chalkboard paint so they could be decorated by the small gardeners in the family.

If you are interested in having us design and install a children’s garden at your home, school or daycare, please contact us. We would love to work with you, no matter what size your space or budget!

Posted in Uncategorized | Leave a comment

Cleaning Up The Garden After Winter Damage

Our gardens have had a rough time this winter in Vancouver. Lower than normal temperatures and a succession of snow storms has given lots of plants a real battering. But before you rush to dig out plants and throw them in the compost bin, here’s a few tips on how to revive winter damaged plants.

  1. Do the scratch test

First of all, you need to know if your plant is dead or alive. The easiest way to do this is to scratch the bark with your thumbnail. If the stem is still green under the bark, the plant is still alive. If it is brown, it is most likely dead. You can also dig into the main trunk at the base of the trunk or roots of the plant. If the roots or main trunk are soft or rotting, the plant is most likely to be dead.

2. Be patient

If you are still not sure after doing to scratch test above, be patient and give the plant some time. Plants often look very rough (with scorched, browned or drooping leaves directly after harsh weather) but they will bounce back given the chance. Often the plant has dormant leave buds that will open when the temperature warms up and the hours of sunlight increase. So even if a plant has dropped a lot of leaves or just looks rough, give it a chance to bounce back before digging it out.

3. Prune out damaged branches

Once the winter weather has passed, get out and prune the damaged plant. Broken branches should be pruned back to just above an undamaged live bud (you will know a bud is alive by cutting into a branch/stem until the wood is green and not brown, just like the scratch test above). The best time to do this pruning is when the new growth starts to appear in spring (and when the last of the harsh weather has passed). Depending on the amount of damage, you may need to give the plant a really hard prune, removing one-third or even half of the damaged plant. The plant should always be pruned to below the point damaged or a large split on a branch.

Brown leaves may be caused by sun or wind damage. These leaves can be removed by hand or with pruners in mid spring (don’t remove them earlier as these older leaves may be protecting the new growth underneath; provide them with some protection until the temperatures have increased in spring).

Here’s a good video of a gardener pruning Boxwood after winter damage. 

4. Tie up trees/shrubs

Snow and ice can weigh down the branches of trees and shrubs , causing the plant to splay open. It is important to get out and tie or stake these branches before the plant comes out of dormancy. Once the sap starts flowing, you may cause more damage. As soon as the snow or ice has passed, get out and give the plant additional support with ties or stakes.

Here’s a short video of a cedar that is going to be tied after winter damage.

4. Replant exposed roots

Sometimes the weight of snow and ice on branches can cause a plant to topple over and leave some of its roots hanging out of the soil. If one third of the roots are still in the ground, replant the plant as soon as ground has thawed. Depending on the size of the plant, you may need to use three stakes to provide support. Remember that the roots are what anchors or hold a plant in the ground. If the roots on one or both sides of the plant are damaged, you will need to compensate by providing additional support on the side where the roots have been damaged. If less than a third of the roots on a large shrub or tree are still in the ground, it will need significant staking or it may be safer to remove it. If not sure of a tree’s safety, consult an arborist.

Sometimes small, shallow-rooted plants (typically small shrubs or perennials) can be pushed out of the ground by extended periods of frost. If this happens, dig a new hole and replant as soon as possible.

5. Give plants a helping hand

If a plant has had a rough time of it during the winter, give it the best chance to recuperate by applying a general purpose fertilizer when the ground has thawed. This will encourage strong regrowth on the plant.


Want to learn more?

Listen to Brian Minter talking about fixing winter damage to plants, on BC Almanac in February 2017.

Read some useful information on dealing with frost damage, from the Royal Horticultural Society

Watch this video of a gardener giving a frost damaged shrub a hard prune in spring. 


Want some help in your garden after the winter damage? Contact us at Growing in the Garden.


Posted in Clean-up, Spring, Winter Gardening | Tagged | Leave a comment

Gardening with the Climate in Mind

In November of last year the 2015 Climate Change Conference resulted in an agreement by the 195 member countries to reduce their carbon output “as soon as possible” and to do their best to keep global warming “to well below 2 degrees C”. Read more here.

All the talk of the Climate Change Conference in the media has motivated me to tackle the issue in this blog. What role do gardeners play in climate change?

It’s all about the Carbon

Well OK, its not technically just about carbon, but this is a gardening blog not a science blog, so in the interest of keeping it simple, I’ll focus on how gardeners can help reduce the amount of Carbon Dioxide (one of the three most lethal greenhouse gases) emitted into the atmosphere and how gardeners can help reduce the amount of Carbon Dioxide in the atmosphere by absorbing carbon.

Carbon Sinks and Carbon Sources

A garden can be either a carbon source or a carbon sink. A carbon source is one that emits more carbon dioxide than it absorbs. Conversely, a carbon sink absorbs more carbon dioxide than it emits. The ultimate goal would be to have a garden dramatically reduce or even eliminate its carbon emission, and ultimately to absorb carbon dioxide from the atmosphere.

Reducing Carbon Emissions in your Garden

Here are some simple practices that the home gardener can adopt in order to reduce their carbon footprint.

Reduce the Use of Power Tools – power tools that run on gas or electricity use carbon. Think about reducing the size of your lawn so that you can use a reel mower. Consider having informal hedges that can be maintained without the use of gas-powered hedge trimmers.

Reduce or get rid of your lawn – lawns require water and fertilizer to look like that beautiful lush lawn we see in our neighbourhood. Consider using decking or patios for outdoor living spaces. Think about using  alternative ground covers if you want to retain some green space around your property that doesn’t require mowing, watering or fertilizer. If you want to keep your lawn, leave the grass clipping on the lawn. They will be a natural source of nitrogen which grass needs to stay green and healthy.

Use compost instead of synthetic fertilizers – home made compost, using food and garden scraps, can be used to feed plants effectively.

Reduce or eliminate water use in your garden – choose drought tolerant plants that require little or no water when established (read this article on drought tolerant plants for Vancouver). Add a mulch layer to your soil to increase the soil’s capacity to retain moisture and reduce evaporation (read this article on mulching). Install a rain barrel to capture rainwater during the rainy season that can then be used to water plants during the summer months. Choose the most efficient irrigation methods (e.g. drip irrigation versus pop-up sprinkler) in areas that will require water.

Turning Your Garden into a Carbon  Sink

A garden that acts as a carbon sink basically absorbs carbon dioxide that is in the atmosphere. The term given to carbon absorption by soil and plants is ‘carbon sequestration’.

Carbon Sequestration in Soil – the carbon in soil  is held in humus (the organic matter in soil). Humus is quite resistant to releasing its stored carbon into the atmosphere. By building up the humus content of your soil, your garden beds can be used to store carbon that might otherwise find its way into the atmosphere – in other words, your garden becomes a carbon sink. In order to build up the humus in your soil, you need to add compost. That’s a whole blog of its own, which I’ll write about soon. Another way of ensuring that carbon is not lost from soil is to leave the soil alone: rototilling and  heavy digging accelerate the loss of stored carbon into the atmosphere.

Here’s a few practical tips on what the home gardener can do to store carbon in soil:

  • use organic soil amenders instead of synthetic fertilizers.
  • spread a yearly mulch on top of your garden beds, using an organic mulch.
  • allow leaves and other plant residues to decompose on the spot (read this article on Chop and Drop’ gardening).
  • grow nitrogen-fixing plants.

Carbon Sequestration in Plants – put simply, plants take carbon from the atmosphere and use it to produce their own food. This is part of a process know as photosynthesis. Some ways for home gardeners to increase this type of carbon sequestration in their garden include: planting trees and shrubs (woody plants sequester more carbon than perennials); growing tough, adaptable, native plants; avoiding disease-resistant plants; planting a diverse mix of trees, shrubs, and perennials (biodiverse gardens are more resilient).

So there are lots of ways that home gardeners can reduce their garden’s carbon footprint.

Want to learn more?

Want some help designing or installing a climate-friendly garden? Contact us at Growing in the Garden.

Posted in Climate | Tagged | Leave a comment

Fall clean-up – to chop or not to chop

The Winter Cut

When fall arrives, many home gardeners and landscapers rush to get the garden ready for winter. Among the many jobs that need to be done to ‘put the garden to bed for winter’  is the cutting back of herbaceous perennial plants (plants that are non-woody, and that die-back in the fall, reappearing the following spring).This cutting back is most often done to maintain a clean and neat appearance in the garden. But if you can bear a slightly less pristine wintertime garden, it may be worth putting the shears down until spring.

Not to Chop – The Upside

There are several benefits to delaying the cutting back of perennials until early spring.

Food and Shelter for Wildlife     Birds enjoy harvesting ripe seeds from perennials and annuals. Perennials with seedheads that might otherwise have been removed, become a great food source for birds when food is scarce in winter.Worms tend to enjoy hanging out in decaying plant material that has been left in a garden bed; another valuable food source for birds in winter.

In the picture below (at City Farmer, The Vancouver Compost Demonstration Garden in Kitsilano) the flowerheads of Rudbeckia (Black-eyed Susan) are being enjoyed by an American Sparrow.

rudbeck

In addition to providing food, decaying stems and leaves can provide valuable winter shelter for a range of creatures.

Winter Interest in the Garden    Winter interest in the garden can easily be overlooked when creating garden beds for spring or summer colour. But when all the flowers have faded and the display of fall leaves has passed, perennials can provide architectural interest throughout the winter months.

Return Energy to Plant Roots    Plant roots send energy  (food) to the flowers, fruit and leaves of the plant throughout the spring and summer growing season. As summer ends, that energy is returned to the roots to keep the plant healthy over winter and ready to reemerge in the spring. If stems are cut back too early, the plant does not have a chance to return that energy to the roots.

When to Chop

There are many perennials that start to break down as the rain starts and temperatures cool, quickly going from upright to a messy,slumping heap. It’s a good idea to cut down these perennials. Hostas, for instance,  will quickly start to break down and lie on top of the crown of the plant over winter. This wet, slimy layer can encourage crown rot ( a fungal disease in soil,spread most easily in wet conditions). The leaves and stems of plants that become wet and slimy can be cut back as they start to break down, and added to the compost bin as a nitrogen source. If a tender new crown is emerging it can be protected with a blanket of fallen leaves.

‘Chop and Drop’ Method and Self-Composting – The Medium Ground

One important method used in permaculture is chop and drop mulching. In this method, plants are chopped and left on the soil right where the plant is growing. In permaculure, these plants tend to be ‘cover crops’ which have been grown specifically for the nutrients they add back to the soil. Here’s an interesting article on the basics of the Chop and Drop method.

In her fantastic Handbook of Northwest Gardening, Ann Lovejoy describes how she lets perennials self-compost in her Seattle garden.

“Instead of spending a lot of time in fall tidying up the beds and borders, I just remove anything that looks unhealthy or that might smother a neighbour. Any plant that has enough natural architecture to stand up for itself gets to spend as much of the winter upright as possible. 

When plants start to slump or decay, I clean up their act…I simply clip what’s left into small pieces. I use my pruning shears to cut stalks and stems into tidbits…..The bits begin to compost.

The scuffling birds mix and remix the raw compost for me, so it recycles into real compost pretty fast. By spring, the clipped bits have become a nutritious breakfast for thousands of tiny soil organisms that in turn feed my plants.” 


So this fall, aim to cut back your perennials a bit more judiciously than you may have done in the past,  and your garden, and surrounding wildlife, will reap the rewards.

Want to read more? Here’s an interesting article by Alys Flowers in the UK’s guardian newspaper.

Need help with your fall clean-up? Or do you want us to design a wildlife garden?  Contact us at Growing in the Garden.

Posted in Clean-up, Fall | Tagged | Leave a comment

Drought tolerant plants for Vancouver

This past summer was a real tester for a plant’s ability to withstand drought conditions. With no significant rainfall since spring, and water restrictions in full force for most of the summer, it’s interesting to see which plants were able to cope, and which weren’t. I captured some shots of how plants did throughout the summer. But before looking at those, what is it that allows some plants to thrive in drought conditions and causes others to suffer?

Drought-Tolerant Plant Characteristics

Plants from naturally dry climates have adapted to survive in those conditions. Many have adapted foliage (leaf) and/or root survival techniques.  These plants are called xerophytes. Here’s a few plant characteristics that are indicators of drought tolerance:

Small foliage: generally, the smaller a plant’s leaf the more likely it is to be able to cope with drought. Plants lose water through the surface of their leaves, in a process called transpiration. By adapting its leaves to be small or narrow, a plant is reducing the amount of water lost through transpiration. One such plant is Rosemary; this Mediterranean herb has small, needle-like leaves. As with many Mediterranean plants, Rosemary copes well in drought conditions.

Grey foliage: many plants with this characteristic have a covering of hairs that help to lower the temperature within the leaf, reduce moisture loss, and limit the drying effects of wind. Lamb’s ear, with its soft, furry looking leaves, copes well with drought conditions.

Waxy or leathery coating: to reduce moisture loss and limit the effects of wind. Blueish foliage often gets its tone from a waxy coating.

Fleshy leaves: succulents, such as Sedums, store water in their leaves.

Long, deep tap roots: plants that have developed this characteristic are able to search for water at lower, cooler levels.

Plants that coped well in Vancouver in Summer 2015

Here’s a list of plants that were coping well at the end of July 2015, after several months of drought conditions. Of course, I don’t know how much or little each of these plants have been watered, but generally I have found that wherever I see these plants throughout the city, they are looking good.

Upright Stonecrop (Sedum ‘Autumn Joy’)

IMG_2133

This clump forming perennial is a great choice for a drought tolerant garden. It holds water in its leaves and stems. When other plants listed as drought-tolerant are starting to suffer, this sedum will still look healthy and happy. Pink blooms on flat flower heads at the end of summer.

IMG_2135

IMG_2130

Groundcover Stonecrop (Sedum rupestre ‘Angelina’, and various varieties) 

IMG_2153

Like Sedum ‘Autumn Joy’ above, this ground cover sedum holds water in its tiny, waxy leaves. Angelina works well in rock gardens or planted as edging near paths. New growth is lime green, turning golden in summer, then bronze in winter.

IMG_2155

Sedum rupestre

Lamb’s Ear (Stachys byzantina) 

Soft, wooly grey leaves that are followed by spikes of pale pink flowers in summer. Works well in a gravel bed or perennial border. Bees loves this plant. Also a good choice in a children’s garden, where kids will love to stroke the beautifully soft leaves.

IMG_2146

English lavender (Lavandula angustifolia)

This lavender’s grey, needle-like leaves make it a good choice for water conservation. Works well in mixed perennial beds, herb gardens or as a low hedge or path border. Loved by bees.

Rosemary (Rosmarinus)

The needle-like leaves of this herb cope well with drought conditions. Rosemary can be used in a herb garden, or as an informal hedge – it can easily reach 3 – 4 feet within several seasons. Many varieties have blue flowers along the stem which are loved by bees.

IMG_2137

Spurge (Euphorbia characias subsp. ‘Wulfenii’)

euphorbia1

Euphorbia comes in a wide range of colurs, from variegated green and white, to deep purple. Wulfenii has grey-green leaves and cupped flowers held in green bracts. If the stem is cut or broken it produces a milky sap which can be irritable to skin or eyes, so not aplant for a garden with children or pets.

Purple coneflower (Echinacea purpurea)

Adds colour to the garden in late summer. Pink daises with high, brown-orange domes.

IMG_2147

Catmint (Nepeta)

Easy to care for perennial. Blue-purple flowers, on upright stems, that will bloom more than once per season if cut-back after initial flowering. This plant is covered in bees when in bloom.

IMG_2148

Posted in Climate, Vancouver | Tagged | Leave a comment

Plants for Spring Interest

Continue reading

Posted in Spring | Tagged | Leave a comment

Spring has Arrived in Vancouver – it’s time to apply a spring mulch

Spring has arrived early this year in Vancouver. The perennials are starting to peek above the soil, buds are getting ready to burst, and yes, weeds are already upon us. These signs tell us that the growing season has begun, and with that, it’s a great time to apply a spring mulch to garden beds.

hostainspring

What is Mulching?

When we talk about mulching a garden bed, it basically means applying a layer of some sort of organic (living) or inorganic material to the soil on our garden beds. There are several reasons why it’s important to apply mulch to garden beds:

  • To retain moisture: as the temperature heats up in the coming months, moisture in the soil will evaporate. To keep that moisture close to the plant roots, we can add a layer of mulch that will reduce evaporation.
  • To maintain/modify temperature: mulch can be used to keep roots cool in summer and protected from low temperatures in winter
  • To suppress weeds: to decrease germination, and make them easier to pull out if they do take hold
  • To add nutrients to the soil
  • To improve the soil tilth or workability

Choosing a Mulch

There are lots of options available for choosing a mulch. As with a lot of tasks in the garden, I think it’s important to ask yourself what your goal or purpose is – why do you want to mulch your garden beds? Do you want to feed your yearly crop of organic vegetables? Do you want to spend less time on your knees pulling weeds? Or do you want to have a beautiful show of blooms on your flowering shrubs and perennials? When you know what you are trying to achieve, you can go about choosing a mulching material. For instance, if you are choosing a mulch for your small organic vegetable bed, your choice will be quite different than if mulching large garden beds in order to suppress weeds.

Here in Vancouver, some of the organic materials that are easily available include composted bark mulch, mushroom compost, homemade garden compost, leaves, composted manure, arborist’s chips, newspaper, and worm compost.

Some Examples

barkmulch

In the garden bed above, wood chips have been used as a mulch. In this bed, the main purpose of the mulch is probably weed suppression. It’s important to know that as wood chips break down they rob some soil nitrogen, and therefore compete with plants for nutrients. However, in this bed, low cost and weed suppression have most likely been the most important factors in choosing a mulch.


leafmulch

In the bed on the left, leaves from the trees above have been left on the bed as a mulch. Fine textured leaves are fine to use as a mulch. Larger leaves or leathery leaves should be shredded when dry before putting on beds. When used as a mulch leaves can return valuable nutrients to the soil.

Contact us at Growing in the Garden if you would like us to apply your spring or fall mulch.


Posted in Mulch, Spring, Vancouver | Tagged , , | Leave a comment

Chewed up lawn? Could be Chafer Beetle Damage

This is the time of year when landscapers aerate and power rake clients’ lawns. Those litttle plugs that the aerator leaves behind can leave lawns looking a little unsightly for a few weeks, but the health of the lawn is improved by allowing more air, water and nutrients to penetrate the grass roots.

What about the other unsightly lawn damage that we are seeing in Vancouver at this time of year? Lawns that look like they have been torn up by some heavy-duty machinery then left for dead most likely have an infestation of Chafer Beetle. Here’s a photo of Chafer damage on a Kitsilano lawn this week.

chaferlawn

While many homeowners think that crows and racoons are responsible for the damage, they are really just foraging an already damaged lawn for a free meal of juicy chafer beetle grubs. I have seen quite a few of these grubs in the soil and in lawns in gardens around Kitsilano this winter and at the monent they are big and fat! Great for hungry crows and other critters.

So what is the Chafer Beetle doing to lawns?

Females lay eggs in lawns in June and July. As the grubs hatch from the eggs in the following weeks, they start to feed on grass roots, feeding right through the winter until the following spring. Their feeding leaves grass lying loose, without its roots to anchor it to the soil. Crows, racoons and skunk easily rip up the rootless grass to get at the grubs. This cycle continues until the grubs pupate and emerge as adults in the summer, and the cycle begins again.

What can be done about Chafer Beetle damage?

As with many pest infestations that affect our garden plants and soil, there is no quick-fix solution for Chafer Beetle damage. In previous years, I have seen many lawns with netting over the lawn, or  CD’s stuck in the lawn. While these can work in scaring away birds and racoons, they don’t deal with the actual problem which is the grubs eating the roots. In fact, by preventing the birds and raccons from eating the grubs we are stopping them from providing a free pest control service. The only control that is allowed in Vancouver, which has a ban on the use of cosmetic pesticides, is the use of nematodes. When added to the lawn during a brief window of time in July these parasites burrow into the body of the chafer beetle grub and kill them. Here’s a video of my collegaue, Maria Keating at City Farmer, explaining how to apply the nematodes.

Nematodes are available in garden stores in early July. Often you will need to add your name to a list as supplies can be limited. If you would like us at Growing in the Garden to apply nematodes to your lawn, please contact us.

Posted in Chafer Beetle, Vancouver | Tagged , | Leave a comment

Children’s Gardening Workshops 2015

I will be running a series of children’s gardening workshops at City Farmer in Kitsilano starting this spring.The workshops will give kids the chance to learn about nature hands-on, at City Farmer’s organic demonstration garden in Kitsilano.

Children will learn about the lifecycle of the garden in six workshops running from Spring to Fall:

  • Sunday May 10th – Spring Planting
  • Sunday June 7th – Worms in the Garden
  • Sunday July 5th – Bugs and Bees
  • Sunday August 9th – Flowers
  • Sunday Sept 13th – Fall Harvesting
  • Sunday October 4th – Putting the Garden to Bed and Seed Saving

Workshops run from 9.30am – 11.00am. $20 per workshop or $100 for all six. Contact City Farmer at 604 736 2250 to register.

Childrens Workshops

Posted in Children, Vancouver, Workshop | Tagged | Leave a comment